|
How
to Install
"Citrix Receiver" and Version 1.1 |
October 11th, 2018
Hitachi Metals, Ltd. Information Systems
Division
contents
1. INSTALL NEW CLIENT SOFTWARE
1.1 Download the ole cilent software removal tool
1.2 How to uninstall �gCitrix
Receiver 4.9�h
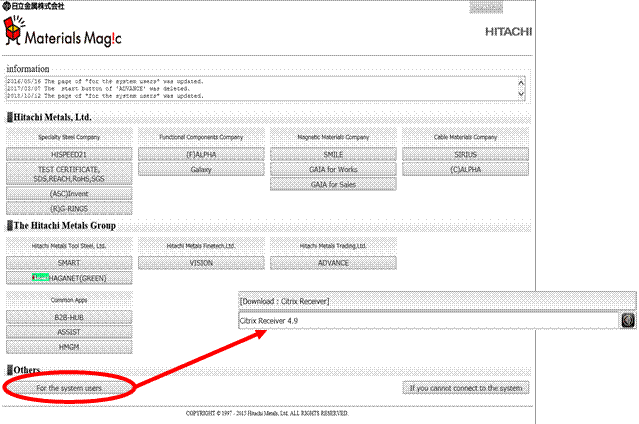
1.3 Download �gCitrix Receiver 4.9�h
1.4 How to install �gCitrix
Receiver 4.9�h
2.1 Check to start up the system
2.4 In the case of you cannot
connect to the bussines system..
[New XenApp
Environment Switching Flow]
�@Please refer to the following workflow, please execute each processing
at your terminal.
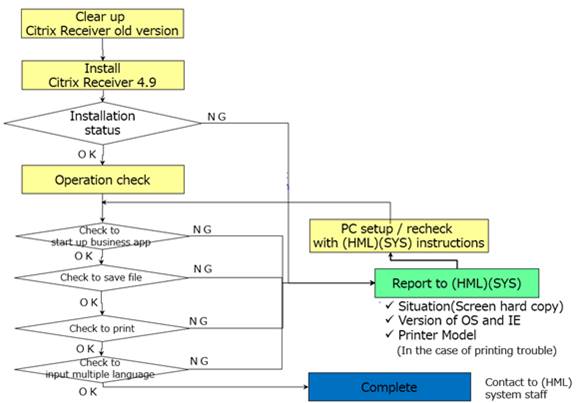
1. INSTALL NEW CLIENT SOFTWARE
1.1 Download the ole cilent software removal tool
To
uninstall the Citrix Receiver version older than Citrix Receiver 4.9, please
delete it using the special clear tool. The download URL of the clear tool is
as follows.
http://hmgssiw.proterial/portal/CitrixReceiver/ReceiverCleanupUtility.exe
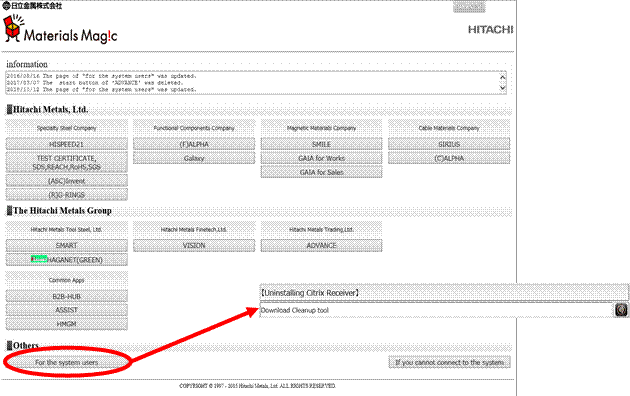 Those who use the customer site can
download from the menu below.
Those who use the customer site can
download from the menu below.
1.2
How
to uninstall �gCitrix Receiver 4.9�h
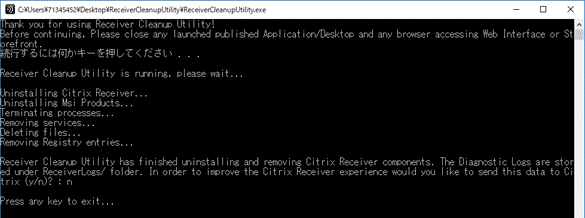
1. On the
target PC, right click on the install module (ReceiverCleanupUtility.exe) and
click "Run as administrator".
2. The
following screen will be displayed, and press [Enter].

3. You will
be prompted to send information to Citrix.
Enter [n]
and press [Enter].
4. The
following screen will be displayed, and press [Enter].
5. Check
that Citrix Receiver has been deleted from [Control Panel]> [Add / Remove
Programs and Features or Programs].
6. Restart
your computer.
7. Installation
is completed.
You can
delete the installation module �gCitrixReceiver
49.exe�h.
8. Please download
the �gCitrix Receiver 4.9�h.
1.3
Download
�gCitrix Receiver 4.9�h
The
procedure for downloading Citrix Receiver 4.9 is as follows.
1. In the case
of connection from customer site
Please download from the menu below.
2. In the
case of connection from the portal site of each company using SMART
�@Please download
from the menu below.
�@
1.4
How
to install �gCitrix Receiver 4.9�h
1. On the target PC, right-click the
installation module �gCitrixReceiver 49.exe�h and click
�gRun as administrator�h.
*You can only run by administrator.
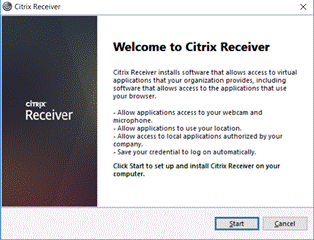
2. Click "Start" in the
following screen.
 �@
�@
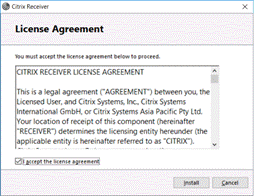
3. Check the check-box
�gI accept the license agreement�h, and click �gInstall�h.
(If you don�ft check the
check box, you cannot click �gInstall�h�j
�@�@  �@�@
�@�@
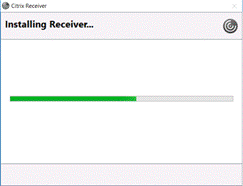
4. The installation will be begun.
�@�@�@ �@
�@
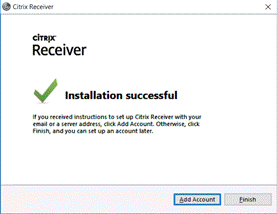
5. When installation is completed, the
following screen will be displayed.
Click �gFinish�h.
�@�@�@ �@
�@
6. Restart your computer.
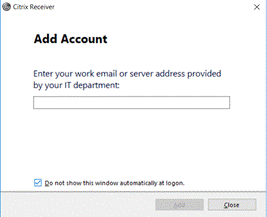
7. When you get the following screen, check the
check-box �gDo not show this window automatically
logon.�h and click �gClose�h.
* When you log on as a different user,
you may see the following screen again, please do the same procedure: 7.
�@�@�@�@
8. Installation is completed. You can delete
the installation module �gCitrixReceiver 49.exe�h.
2.
CHECK
OPERATION
2.1 Check to start up the system
Please
check the connection to system you use from the check site below.�@�@
http://hmgssiw.hitachi-metals.com/hm_0k/us/index.html
�� If
you can not connect to the business system �� see 2.4.
2.2 Check to print
On each system you use, please check
that you can print normally
�@�ENormal printing with the
printer you use
�@�@No Garbled characters /
broken forms
�@�@No problems about printing
bar-coard etc
�@�c
�@�EThe printing time is not
much different from the old system
2.3 Check to save
file
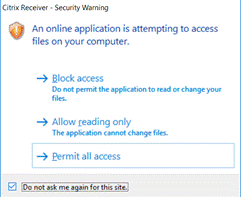
�P�DIf you get the
following screen on loging in each system you use,
you should check the check-box �gDo not ask me again for this site.�h and choice
�gPermit all access�h.
�@�@ �@
�@
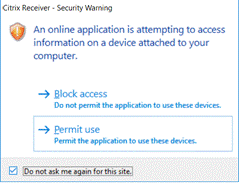
�@�@When you get the following screen, you should check the check-box �gDo not ask me again for this site.�h and choice �gPermit use�h.
�@�@ �@
�@
2. On each system you use, please check that
you can save Excel file for frequency used reports to your PC.
On the following screen, you will see the display output �gM:\�h of
Excel file.
(The old system wa �gC:\�h)
But you can get a file on your terminal�fs �gC:\�h.
�@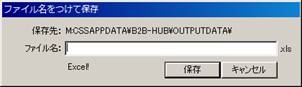
*The Excel file from
each business system is saved in the folder of each system name under "C:
\ CSSAPPDATA" of your terminal. When you update your PC, please create
�gCSSAPPDATE�h folder under �gC drive�h before you use the system on new PC.
For security management, please
contact your system administrator if administrator authority is necessary for
folder creation.
*The case of if the
above procedure is executed but file saving is not possible
�@.
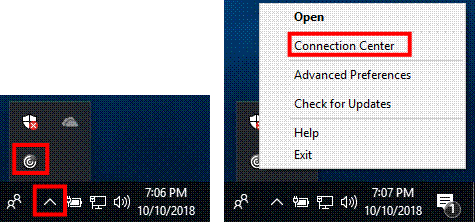
With the target application running, click �� in the
lower right corner of the desktop, right click on Citrix Receiver, and open
[Connection Center].
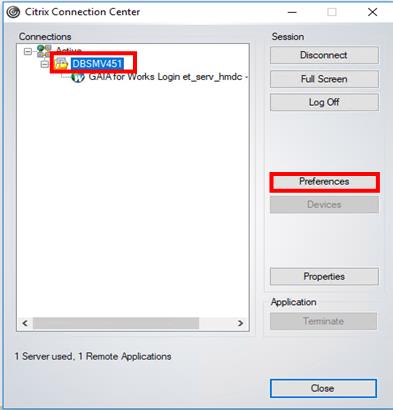
�A.
Open [Preferences]
�B. If
[Read & Write] is unchecked, put a check, and then click [Apply] and [OK].
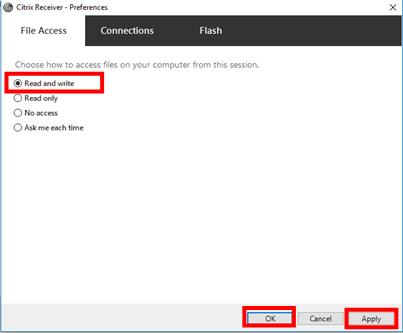
�C
Please try again to save the file.
* If you
still can not save the files, Please
contact us from here.
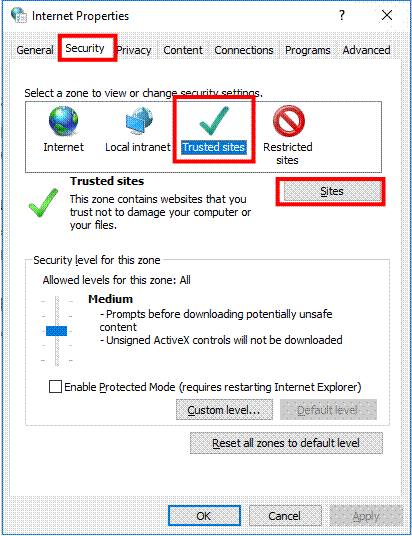
2.4 In the case of
you cannot connect to the bussines
system
1. Open
[Control Panel]> [Internet Options].
2. Press
[Security]> [Trusted sites]> [Site].
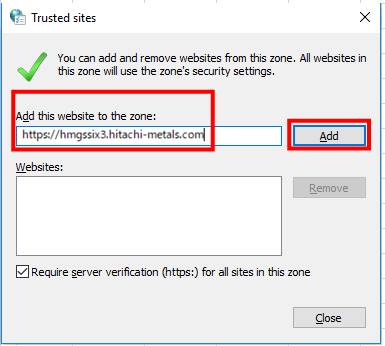
3. Add the
following URL to "Add this website to the zone" and press the [Add]
button.
https://hmgssix3-y.proterial.com
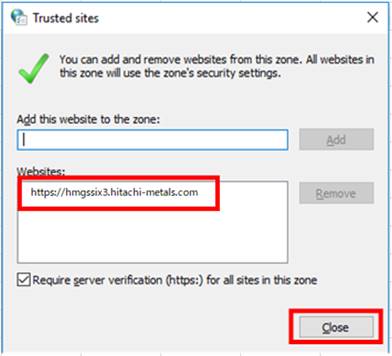
4. Check
that it was added to the website and press the [Close] button.
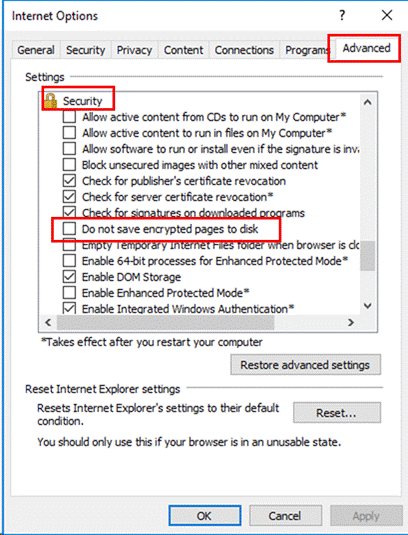
5. Uncheck
the [Advanced]> [Do not save encrypted pages to disk] check box.
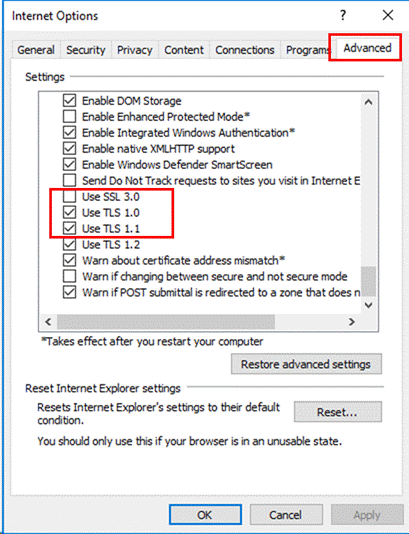
6. If you
do not check any of [Use TLS 1.0] [Use of TLS 1.1] [Use TLS 1.2], check all.
* If
there is already a check on either one, there is no problem as it is.
7. Press
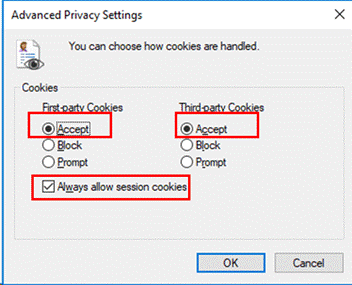
[Privacy]> [Advanced].

8. Check
[Accept] and [Always allow session cookies].
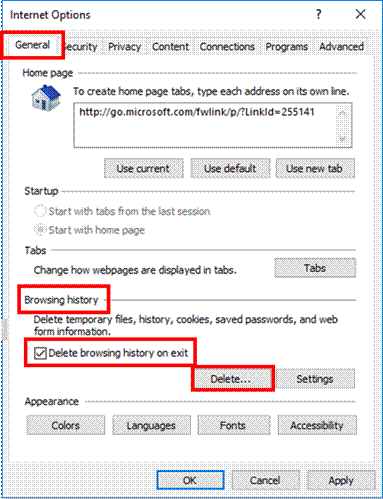
9. Check
[General]> [Browsing history]> [Delete browsing history on exit].
Press the
[Delete] button.
10. Check
[Temporary Internet files ...] and [Cookies and Web · · ·] and press the
[Delete] button.
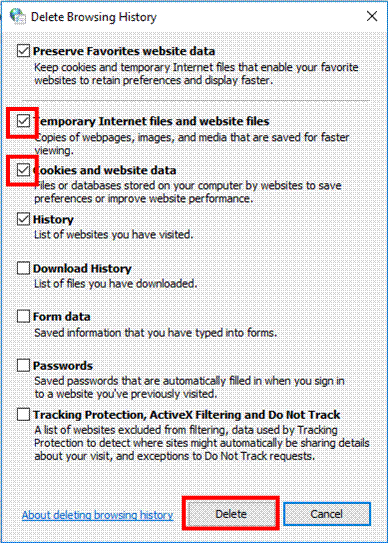
11. When
the delete screen is over, it is completed.
12. When
all settings are completed, close it with the [OK] button.
Please
restart your computer and try again to start the application.
3. Other communication memo
Contact address
�@About installing
or checking, if you have any questions or problems, please contact to the
following.
��Hitachi
Metals, Ltd. Information Systems Division
Email for support
contact�F
zzml000-hon-XenApp-D.hm@proterial.com
�@�@�iAll�j
�@�@�@�@Yokota Morimasa �@ Tel:048-531-1174�@�@�@�@
�@�@�@(Manager)
�@�@�@�@Liu �@Jie�@ �@�@ Tel:048-531-1736